Have you ever seen a yoga posture that took your breath away? For many, that pose is Kapotasana, the deep and majestic Pigeon Pose. It looks like the ultimate expression of freedom and flexibility.
I remember watching my teacher arch gracefully backward into this shape. My jaw literally dropped. At that time, my own spine felt stiff as a board. It felt completely impossible for my body.
But yoga is a journey of small, mindful steps. Just like mastering complex balancing moves like Shirshasana for beginners, deep backbends require a solid foundation. You cannot rush the process of opening your heart and hips.
Today, we will explore Kapotasana for beginners. We will learn how to explore this intense posture with absolute safety, patience, and love.
What is Kapotasana and Why is it So Powerful?
The word Kapotasana comes from Sanskrit. Kapota means dove or pigeon, and asana means posture. When you hold the full pose, your puffed chest resembles a proud pigeon.
In modern yoga studios, people often use the name “Pigeon Pose” for a gentle, sleeping hip stretch. However, the traditional traditional Kapotasana is a powerful, deep backbend performed from a kneeling position.
This posture is highly revered because it challenges us on multiple levels. It demands deep flexibility in your hip flexors and quadriceps.
Simultaneously, it requires immense strength in your spinal muscles. It is a beautiful marriage of vulnerability and power.
How to Do Kapotasana safely: Step-by-Step Instructions
Safe execution is your number one priority when exploring deep backbends. Never force your spine into a shape it is not ready for. Follow these steps mindfully, and always keep your breath smooth and steady.
Step 1: Set Up Your Kneeling Foundation
Start by kneeling upright in the center of your mat. Keep your knees exactly hip-width apart. Press the tops of your feet firmly into the floor. Your thighs should stand completely perpendicular to the ground.
Place your hands on your lower back with your fingers pointing downward for initial support.
Step 2: Lengthen Your Spine Upward
Inhale deeply and lift your chest toward the sky. Imagine creating space between every single vertebra in your column. Draw your elbows gently toward each other behind your back. Roll your shoulders away from your ears.
Keep your lower belly pulled in tightly to protect your lumbar spine.
Step 3: Initiate the Backbend from Your Upper Back
As you exhale, begin to lean backward mindfully. Do not simply collapse into your lower back. Instead, lift your sternum up and over an imaginary beach ball behind you.
Keep your hips pressing forward so they stay stacked directly over your knees. Drop your head back gently only if your neck feels entirely comfortable.
Step 4: Reach Your Arms Overhead
Slowly bring your hands to your heart center in a prayer position. If you feel steady, extend your arms straight up past your ears. Reach your fingertips toward the wall behind you.
Keep your shoulder blades hugging your back ribs firmly to support your heavy chest.
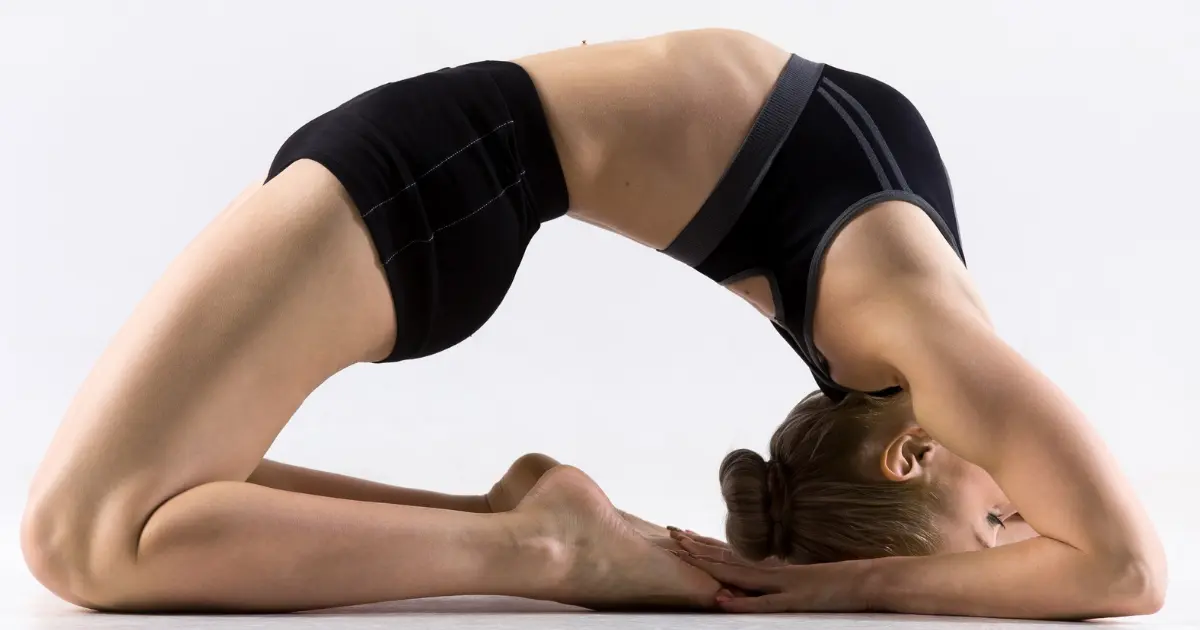
Step 5: Lower Your Hands to the Floor
Continue lengthening your spine as you lower your hands toward the mat behind you. If you are a beginner, your hands may just rest on blocks or touch the floor far behind your head.
If you have advanced flexibility, your hands will walk backwards to grasp your ankles or heels.
Step 6: Breathe and Stabilize
Once you reach your personal edge, stop and breathe. Hold the shape for 3 to 5 steady breaths.
Press your shins down to keep your base rock-solid. Keep lifting your hips and forward to maintain the space in your torso.
Step 7: Exit with Absolute Control
To exit safely, press firmly through your shins and engage your core muscles tightly. Use your strong thigh muscles to inhale your torso back up to a vertical kneeling position.
Immediately sit down on your heels and rest quietly in Hero Pose or Child’s Pose for several breaths to let your nervous system settle.
Physical Benefits of Pigeon Pose: A Deep Release
The physical rewards of this posture are truly life-changing. It targets areas of the body that hold chronic tension from daily sitting.
Deep Stretching of Hip Flexors and Psoas
Most of us spend hours tucked into office chairs. This constant sitting causes our hip flexors and psoas muscles to tighten.
This deep backbend provides an intense stretch to the entire front plane of your hips. Releasing this tension can instantly relieve chronic lower back tightness.
Massive Expansion of the Chest and Lungs
As you arch backward, you stretch the pectoral muscles across your chest. This action reverses the rounded-shoulder posture caused by looking at phones.
It creates literal structural space for your lungs to expand fully.
“Deep backbends physically stretch the intercostal muscles between the ribs, significantly increasing your lung capacity and oxygen intake.” — Pulmonary Health and Yoga Researcher
Strengthening the Entire Posterior Chain
Holding an upright backbend requires active muscular engagement. Your hamstrings, glutes, and spinal erectors must fire to keep you lifted against gravity.
This builds a strong, resilient back body that supports excellent posture throughout your day.
Mental Benefits of Both Physical and Emotional Release
Yoga teaches us that the mind and body are fully intertwined. This posture is famous for triggering powerful emotional shifts.
Releasing Deeply Trapped Emotional Stress
In yoga philosophy, the hips are considered the storage locker for suppressed emotions like anger, fear, and anxiety. When we open the hips deeply while exposing our heart to the sky, these buried feelings often surface.
It is completely normal to feel a sudden wave of vulnerability or emotional relief during this pose.
Reducing Anxiety and Tuning the Nervous System
Backbends are naturally stimulating and energizing. They activate the sympathetic nervous system in a controlled, safe environment.
By practicing slow, steady breathing techniques while in this intense shape, you train your brain to stay completely calm during stressful real-life situations.
Breathing Techniques to Navigate the Intensity
Because this pose opens the chest so dramatically, breathing can initially feel restricted or scary. Mastering your breath is the key to finding comfort here.
- Dirga Pranayama (Three-Part Breath): Breathe deeply into your belly, then your ribs, and finally your chest to maximize space.
- Lengthened Exhalations: Focus on making your exhales longer than your inhales to actively trigger your body’s relaxation response.
- Soft Jaw Awareness: Keep your mouth slightly open and your tongue soft to prevent tension from locking up your neck.
Simple Modifications for Beginners and Stiff Bodies
You do not need to touch your feet to your head today to gain the incredible rewards of this posture. Use these accessible variations to practice safely.
The Wall-Supported Method
Stand with your back facing a wall, about one foot away. Kneel down on your mat. As you arch backward, place your hands flat against the wall behind you. Walk your hands down the wall to control the depth of your backbend safely.
Utilizing High Yoga Blocks
Place two yoga blocks on their highest setting right next to your feet. When you lean backward, place your hands firmly onto the blocks instead of reaching for the floor.
This support drastically reduces the pressure on your lower spine.
camel Pose as a Stepping Stone
If Kapotasana feels too intense, practice Ustrasana (Camel Pose) instead. Keep your hands on your lower back or rest them lightly on your heels.
This builds the same foundational strength and flexibility with much less risk.
Common Mistakes and How to Avoid Spine Compression
Because this pose is so deep, poor form can quickly lead to pinching or pain. Avoid these major pitfalls to keep your practice safe.
- Crunching into the Lower Back: Many beginners simply bend from their waist, compressing their lumbar spine. This mistake causes immediate lower back pain. Always think about lifting before you go back. Keep your core engaged to support your lower spine.
- Letting the Knees Splay Wide Apart: When your knees slide outward, you lose the structural integrity of your base. This splaying pinches the sacroiliac (SI) joints in your pelvis. Squeeze an imaginary block between your thighs to keep your legs perfectly parallel.
- Holding the Breath in Panic: When the stretch feels intense, the natural human reaction is to freeze the breath. This signals danger to your brain and causes your muscles to lock up tightly. If you cannot take a smooth, fluid breath, you have gone too deep. Back out immediately.
The Sacred History: Pigeons and Ancient Sages
To truly appreciate this shape, we must connect with its rich history within ancient Indian traditional yoga culture. In ancient Indian mythology, the dove or pigeon is not viewed as a simple city bird. It is seen as a symbol of loyalty, peace, and single-minded devotion.
Old texts like the ‘Gheranda Samhita‘ describe this posture as a way to cultivate absolute mental stillness. Ancient sages would hold backbends for extended periods to clear the energetic pathways, or nadis, running along the spine.
In some yoga traditions, heart-opening poses are associated with feelings of openness, energy, and emotional awareness. When you lift your chest in this pose, you join a beautiful, thousands-of-years-old lineage of spiritual seekers.
Important Safety Contraindications: When to Skip It
Your long-term health is much more important than any yoga pose. Pass on this full backbend if you are currently dealing with:
- Severe knee injuries or recent meniscus surgeries
- Chronic herniated discs in the lower back or neck
- Uncontrolled high or low blood pressure
- Severe vertigo or inner ear balance issues
Stop immediately if you feel sharp pain, dizziness, numbness, pinching in the lower back, or difficulty breathing.
Quick Kapotasana Alignment Checklist
| Body Zone | Alignment Focus | Danger Sign |
| Thighs & Hips | Keep pressing forward over the knees. | Hips sinking backward toward the heels. |
| Core | Pull lower belly inward and upward tightly. | Letting the stomach relax completely. |
| Chest | Lift the breastbone straight toward the sky. | Collapsing the chest downward. |
| Shoulders | Roll them back and down away from ears. | Shrugging shoulders up around the neck. |
Roll Out Your Mat and Open Your Heart
Exploring Kapotasana for beginners is a profound act of courage. It requires you to show up, face your stiffness, and gently melt away your fears. Be incredibly patient with your body. Trust that your spine will open up gradually over time, millimeter by millimeter.
Are you ready to experience the incredible freedom of a fully open heart? Step onto your mat today. Try a gentle camel pose variation with blocks, focus on your deep exhales, and feel your energy completely shift.
You are stronger and more flexible than you think!